LP12MF: Installing the Mober DC Motor Kit
Welcome to the latest installment in my LP12 Modification Frenzy series. This time, I install Mober’s DC motor and power supply.
I’ve had my share of troubles with motors and power supplies over the years. When I bought my LP12 way back in 2005, it had a wonky Valhalla power supply, and so the music would randomly speed up and slow down, making everything sound a track from My Bloody Valentine’s Loveless. Eventually I came across Edmund Chan’s Mose/Hercules II system, which has served me well for over a decade. When I “upgraded” to a Linn Lingo 4, I unfortunately ended up with a dud unit with a noisy motor.
Before the experience with the Lingo 4, I’d always struggled a bit to see what all the excitement was about with power supplies. The job of turning the platter at 33.3 or 45rpm didn’t seem that complicated, and I wondered whether I’d even be able to hear the difference between 33.3 and 33.4 anyway. But the Lingo 4 taught me that speed control is only one part of it; the other, major part is how much noise the motor introduces into the system. Given all the microscopic activity and minute voltages involved in vinyl reproduction, any little bit of noise gets picked up by the cartridge and makes things sound noticeably worse. Indeed, after the recent problems I had getting my Dynavector XX-2 cartridge to sound good, I wondered if really good cartridges were also really good at picking up motor noise…
Enter the Mober DC Unit
I’ve already reviewed a bunch of products by Edmund Chan so far on this site: two of his Mober subchassis (for Rega arms and Linn arms) and his SSP12 subplatter. I’ve been using his Mose/Hercules II power supply for every test to this point but one. I have one of his bearings in my basement, ready to be reviewed in the future. I’m a fan of his products, which I find reasonably priced and great-sounding. It doesn’t hurt that he has in turn become a fan of this website and is the first person on the planet to have sent me review copies. (I bought the Mose/Hercules II and the Rega subchassis with my own money; the SSP12, Linn subchassis, bearing, and this DC unit are review units.)
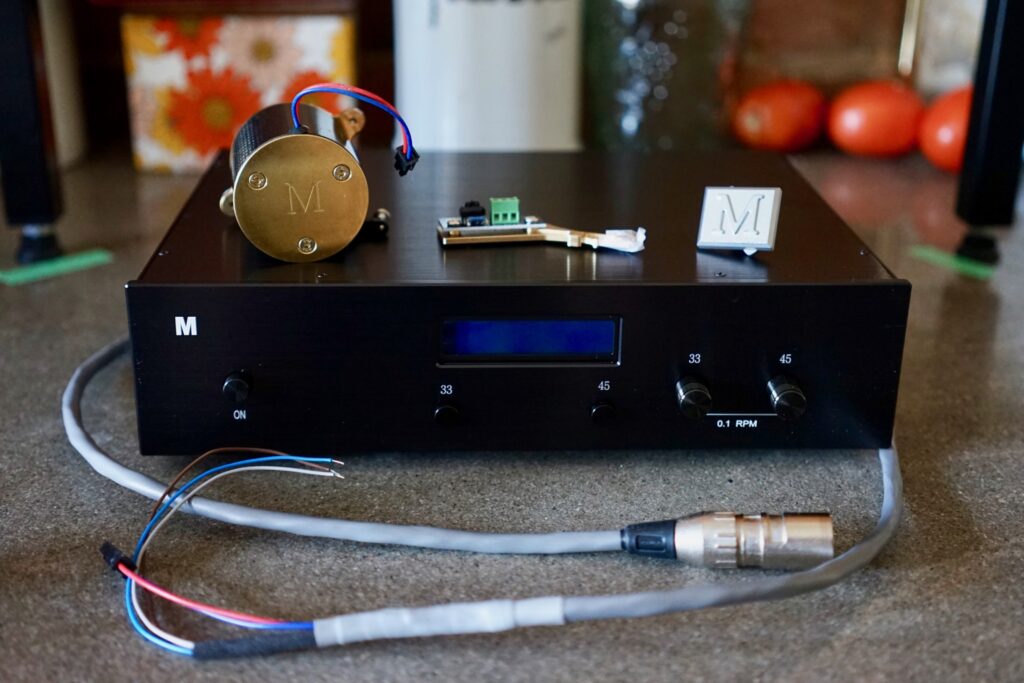
The thinking behind the DC unit is not dissimilar to the thinking behind the Mober subchassis: take something very expensive that Linn makes, come up with your own design, arrange the manufacturing yourself, sell directly via eBay, and sell it for a lot less.
I’ve never tried a Keel, but the Mober subchassis is a similar design, without being a clone. I’ve never tried a Radikal DC power system, but the Mober DC kit is similar without being identical.
Like the Radikal, the Mober uses a Swiss-made Maxon DC motor. According to the eBay product page for the Mober DC unit, the appeal of DC over AC motor is noise. DC motors are much quieter than AC motors; the challenge is keeping them running at a consistent speed, since they’re very sensitive to slight changes in the voltage provided to them.
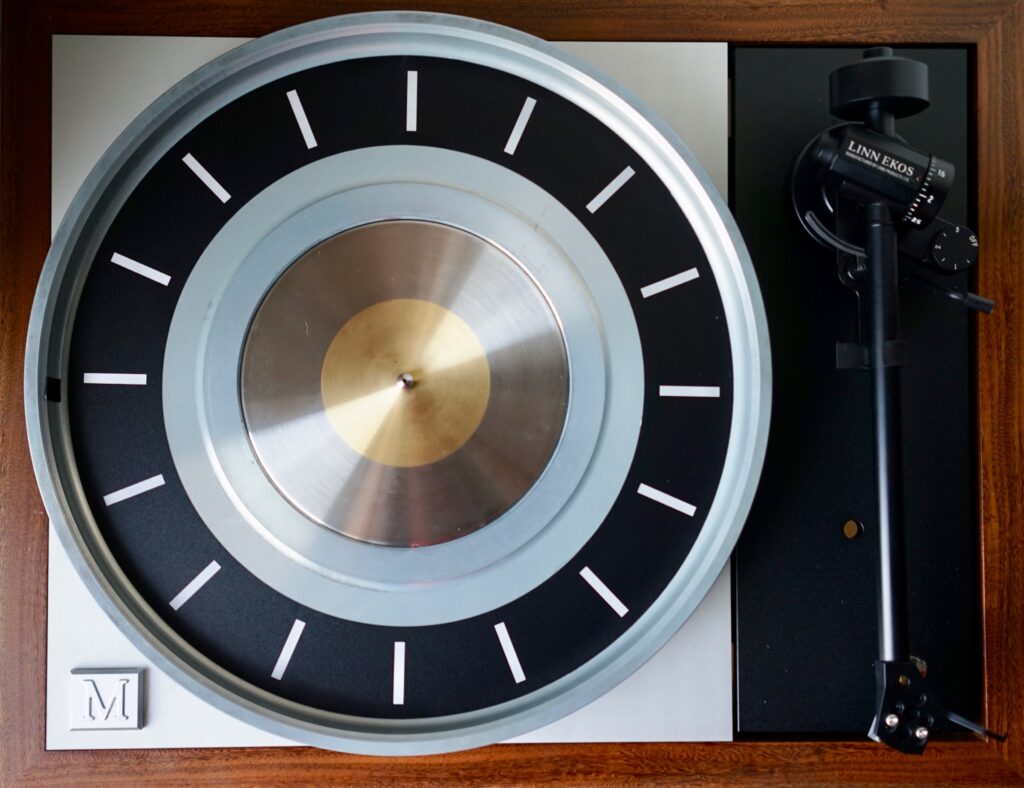
Edmund’s method of doing this is similar, but not identical, to Linn’s Radikal system. The Radikal uses an optical tachometer attached to the top plate which monitors the movement of a single felt marker attached to the underside of the outer platter, and feeds this information back to a control box which responds with changes in voltage to the motor based on the current speed, compensating when deviations are detected. Edmund’s Mober box does all that, but monitors 16 markers rather than one (see photo above). According to him, this means it’s much more capable of responding quickly to deviations from true speed.
Installation Process
I’ve been waiting to get my hands on one of these for months. Back in January, Edmund was planning on sending me one, but the Covid shutdown in China meant that the factory where they’re produced went off line. When they started up earlier this month, Hong Kong Post stopped shipping airmail to Canada. Finally, we sorted out a FedEx shipment. It arrived last week along with the Linn-cut subchassis. I decided to install the subchassis first, given the problems I was having with the Kore it replaced. That done, it was time to get the DC unit in.
Motor systems are relatively easy to install, since you don’t need to remove the tonearm, subchassis, or anything else to get them in. You don’t even need to turn the deck upside down, which is nice, given bearing oil’s penchant for leaking out. Heck, I didn’t even have to remove the subplatter. (Note the little pieces of cardboard I put under the subchassis whenever I move the deck, to keep the bearing safe from shocks. That’s a tip I picked up from Gary Dilliott.)
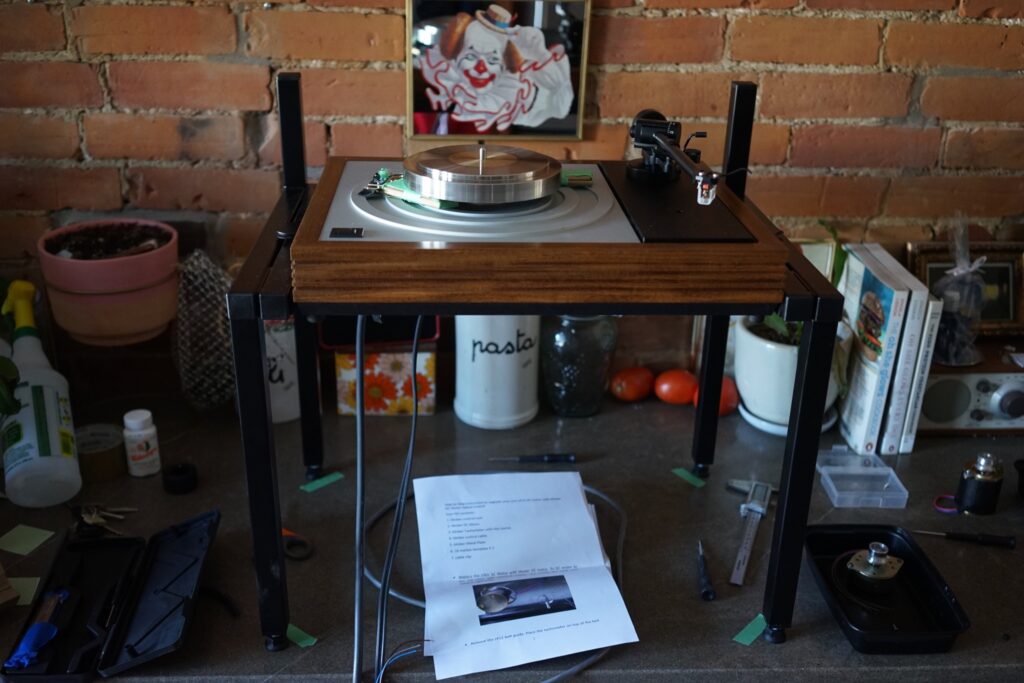
Unlike the Lingo 4, which came with a massive and very detailed set of instructions, Edmund’s Mober has 5 pages of relatively vague instructions. Just to be sure I was doing the right things, I reread the sections of Peter Swain’s LP12 setup manual about the Radikal. Even those instructions are pretty brief. It’s really not a very complicated job. You take out the old motor, put in the new one, install the tachometer, get everything wired up, and “dress” the wires so nothing’s knocking against anything else.
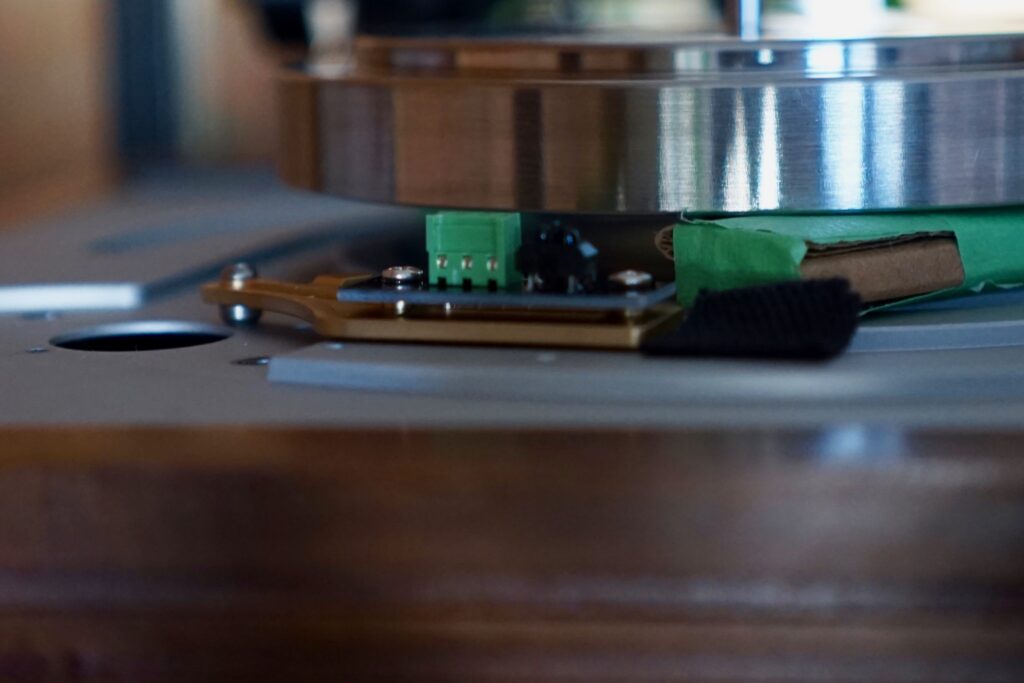
I had experience fitting tachometers with the Lingo 4, and knew it would be a bit of a pain with the Tiger Paw Khan top plate, with its cool but inconvenient ridges. I was prepared this time, anyway. I borrowed a spacer from the outgoing Airpax motor’s mounting screws; it was exactly the right height to hold the tachometer level. I did need to shorten a bolt to the exact right length with a hacksaw and file, but that’s a skill I possess from my bicycle framebuilding days. Also bicycle-related, I put a bit of cotton handlebar tape under the tachometer body to stop it from potentially rattling against the top plate. You can see a piece beside the tachometer in the photo above.
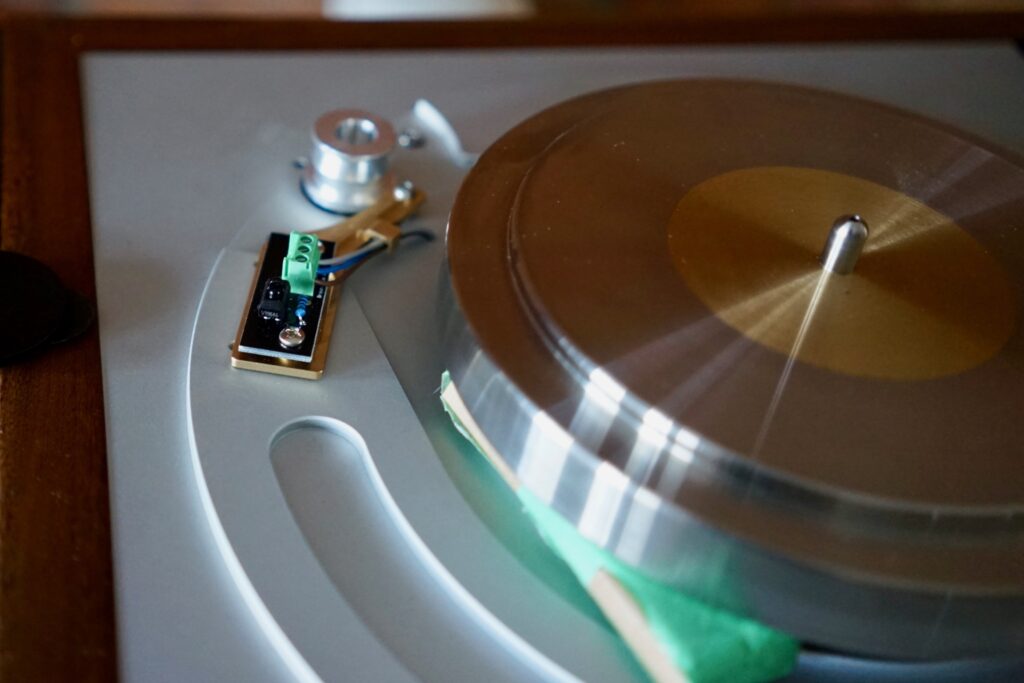
Here it is all set up with the tachometer wires routed. I didn’t get a photo of the underside of the table showing the motor orientation or the cable dressing, because I didn’t want to flip the deck unless I had to. I’ll grab a photo next time I’ve got it upside down. Suffice it to say it was really easy and intuitive to get all this set up. While minimal, Edmund’s manual is probably sufficient for anyone with a bit of experience working with an LP12.
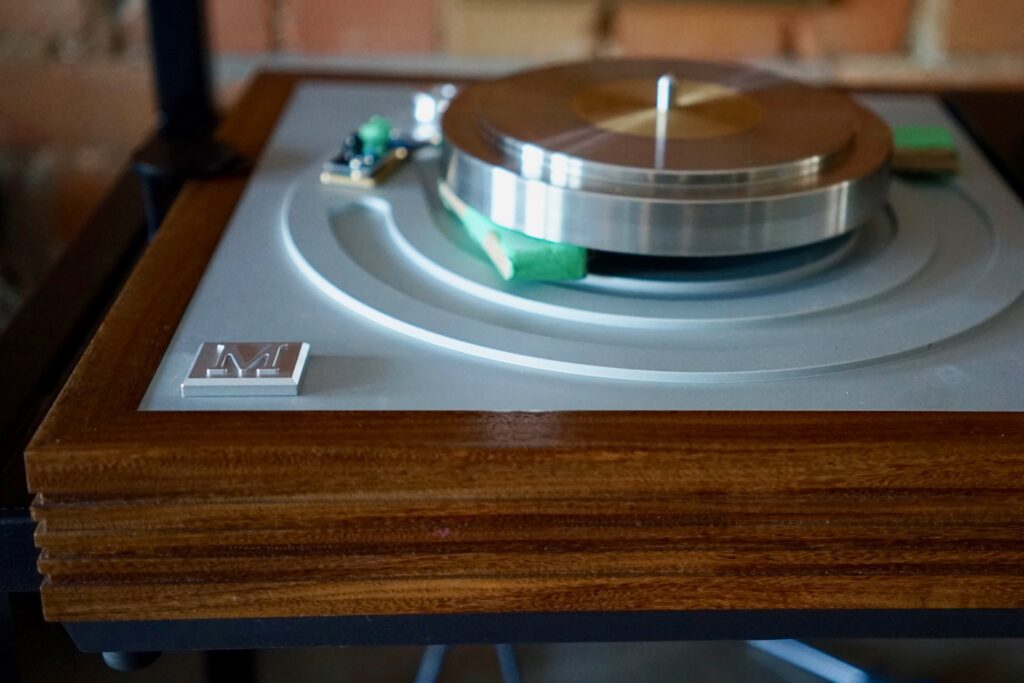
A little metal badge comes with the kit to conceal the now-redundant power switch hole. It was actually much harder to fit than any other part of the kit: very tricky to get it through the hole and tighten it up (it was tricky mostly because the Khan has an extra mounting screw that gets in the way). I must say, I’m not very fond of the look of it. I have no issue with the letter M — my partner’s name begins with it, and there are three of them in my full name — but this seems clunky, overly large, and not very well finished. I’ll have to look out for one of those cool Naim Armageddon switch covers, especially if I end up with an Aro.
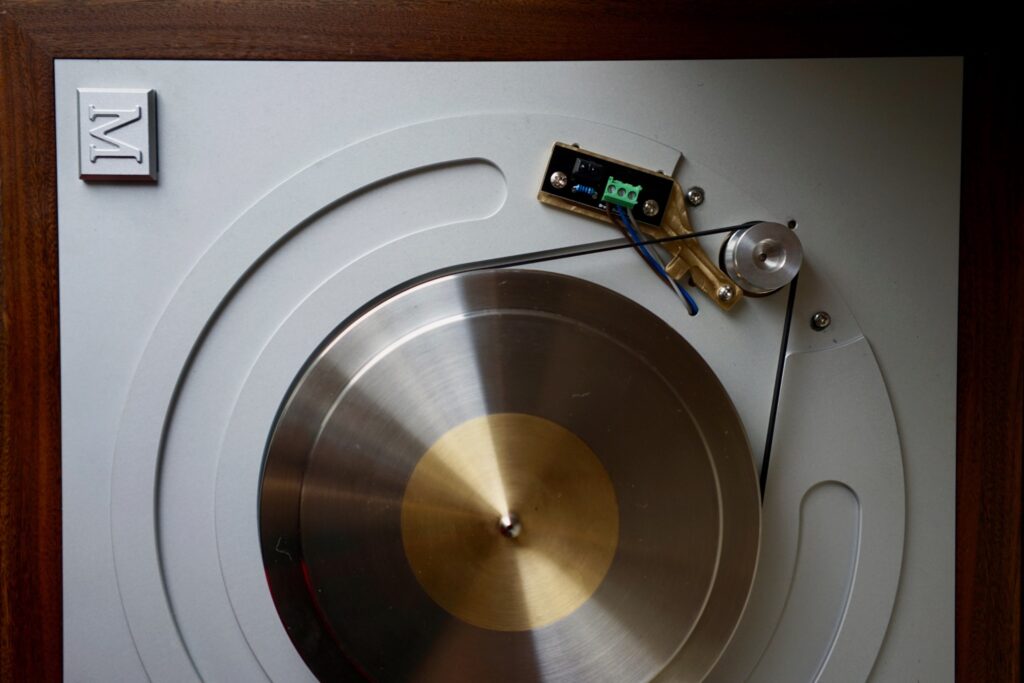
Here’s a somewhat more artistic shot of the top-side view of the Mober DC kit equipment — and their cousin, the SSP12 subplatter.
As I said, installation was very simple. Start to finish, it took me under an hour.
A few updates
I’m writing this section two weeks after initial installation, and I’ve made a few little tweaks.
I was hearing an very faint “swish-swish” sound from the motor, and wanted to investigate whether it was something with the way I’d set it up. It turns out that it was. The tachometer sensor sits on a brass bracket, the “toe” of which connects to one of the threaded holes previously used for speed adjustment screws. This toe portion sat quite close to the motor, which required me to mount the motor slightly off-centre in the round cut-out in the top plate. The motor is mounted to the underside of the top plate with two compliant bushings, so I wondered if under load it was bending slightly and rubbing against either the cutout of the brass “foot.”
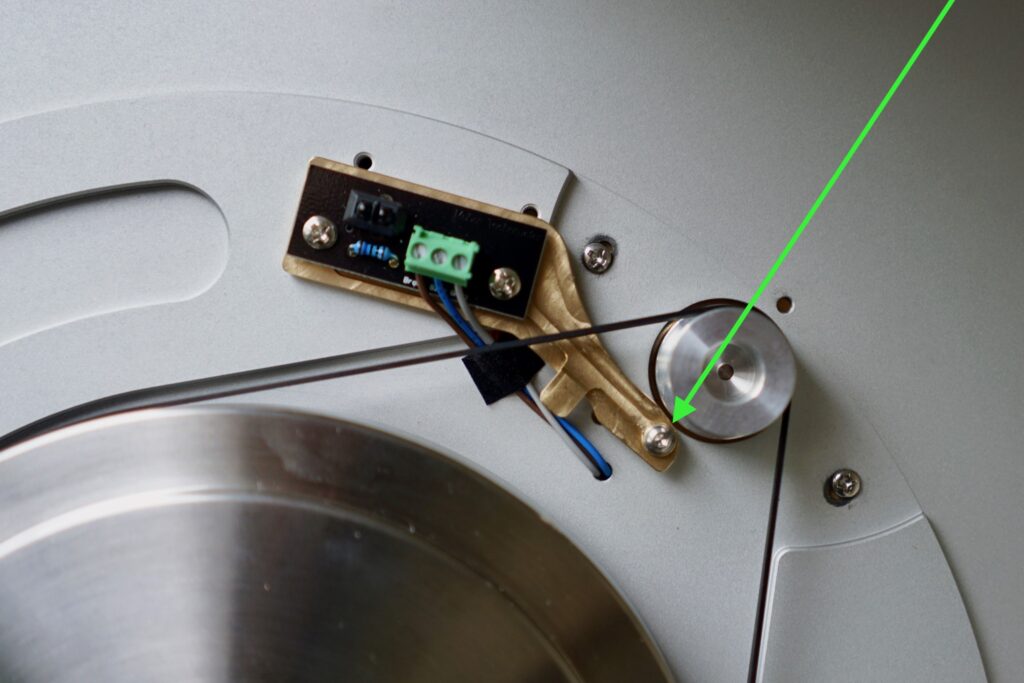
I solved this problem by filing material away from the brass foot (indicated by the green arrow), which allowed me to get the motor dead-centre in the cutout. I also removed the compliant bushings so that the motor is attached directly against the top plate and can’t lean in operation. With these changes made, the “swish swish” is gone.
Having listened to the Mober for several weeks now, I can say that while it is not absolutely silent in operation, it is much quieter than any other motor I’ve used. With my ear pressed against the closed LP12 lid and the motor spinning at 45rpm, I can hear a faint whir. A foot from the deck under normal circumstances, I can hear this if I absolutely strain. Two feet away, I can’t hear anything.
Note the above tweaks may be specific to installing the Mober tachometer on the Tiger Paw Kahn top plate, with its inconvenient ridges. Every other top plate I know of has a smooth surface here.
The Mober DC unit in action
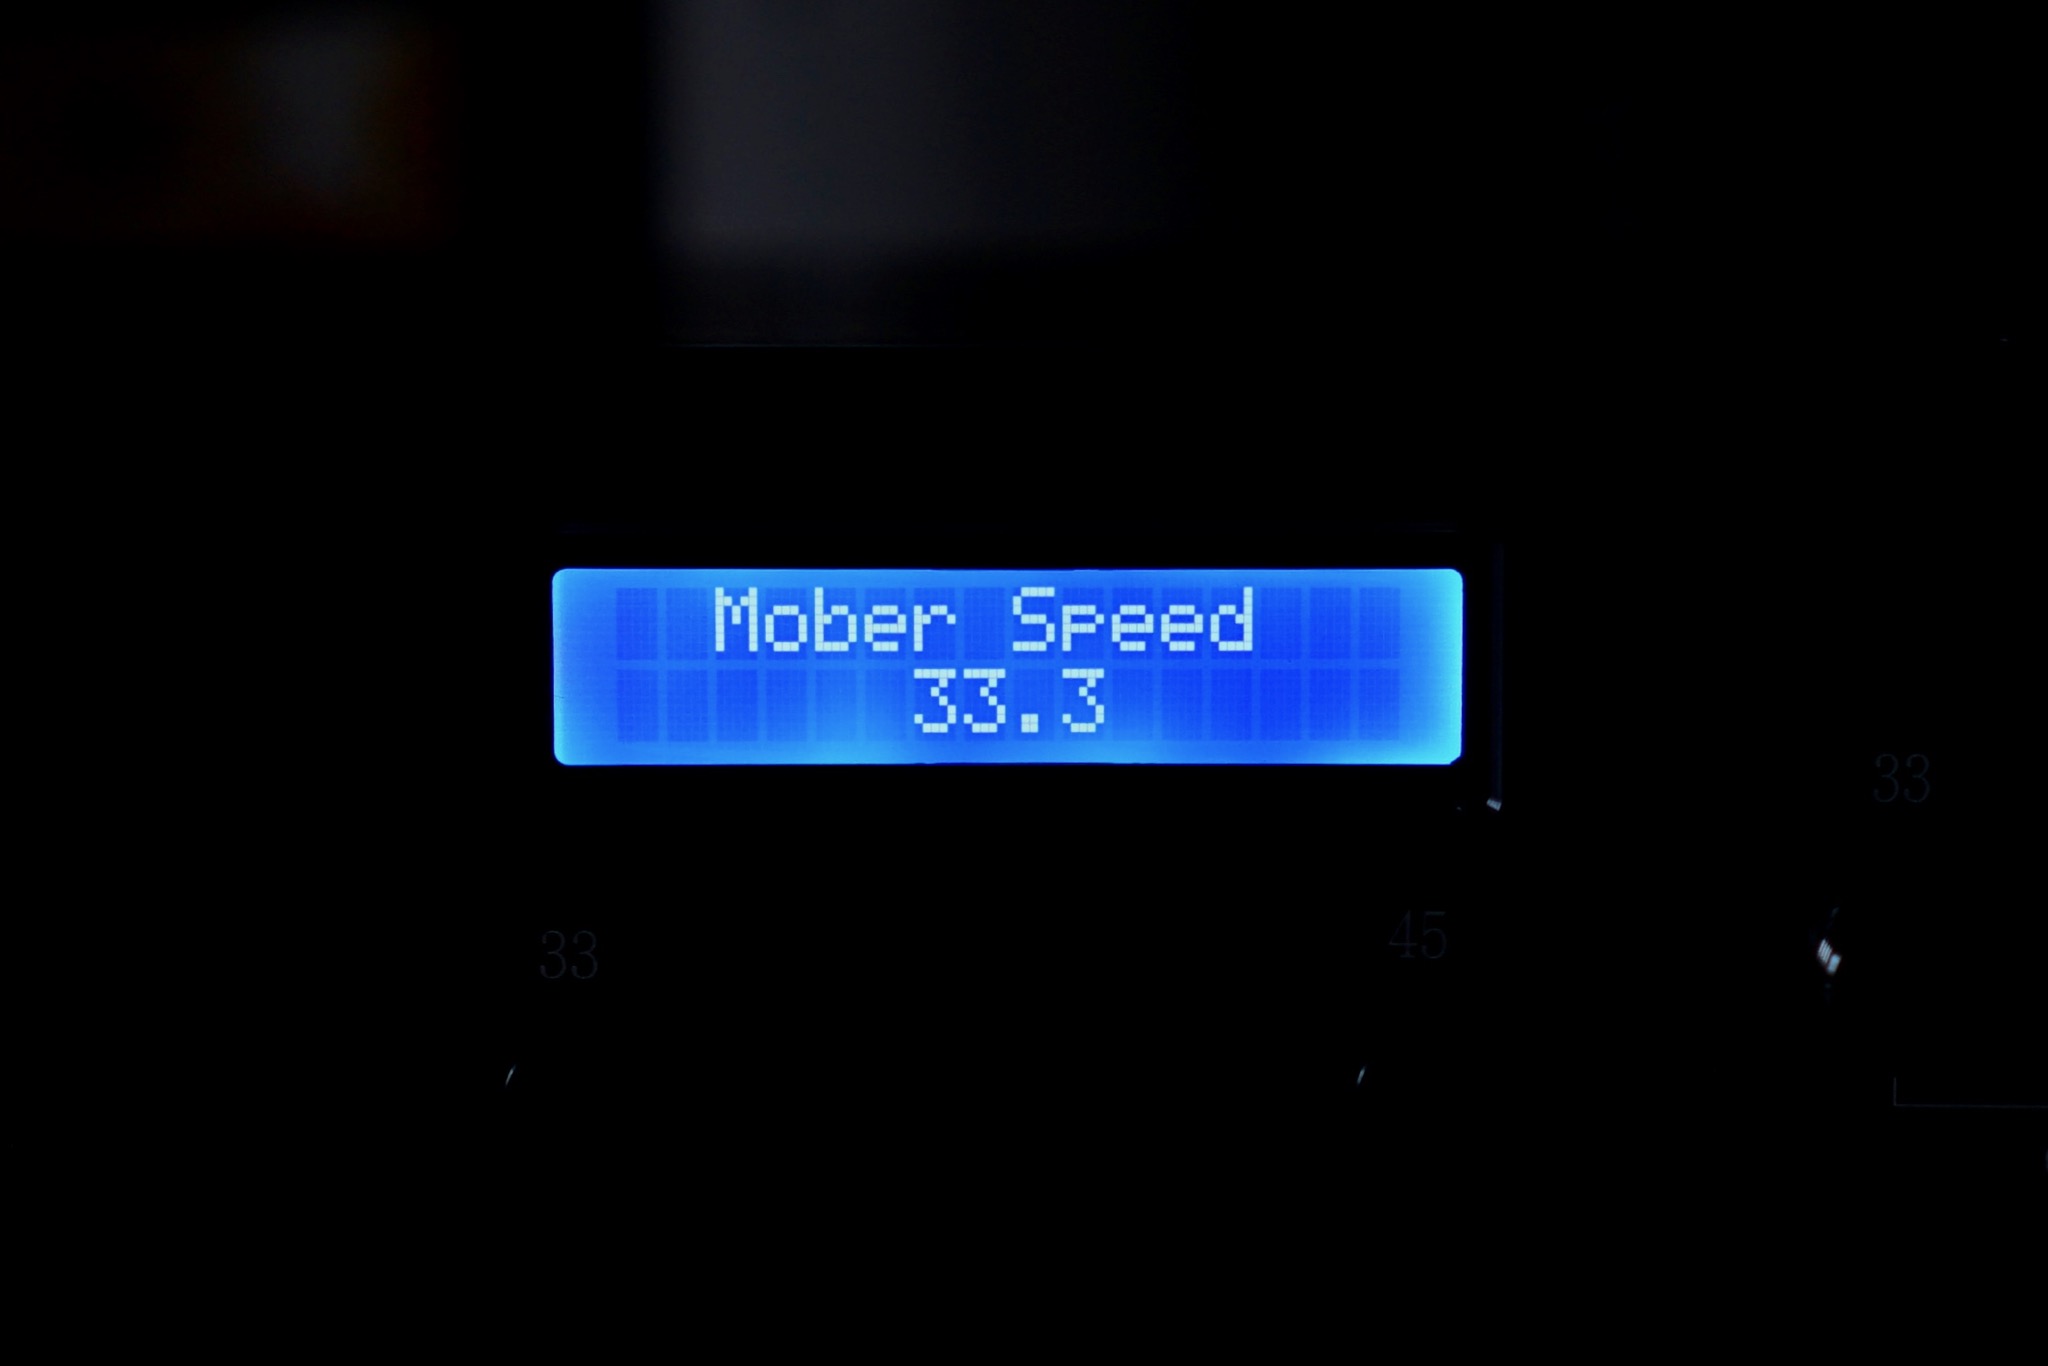
I’ve made a short video to show you how the Mober Unit works. I’d heard that it’s slow to get up to speed and that the motors can be noisy. That’s definitely not the case with mine, as this video shows. The motor gets up to speed quickly, and it’s very quiet. Also clear from this video: the photos on the Mober eBay listing don’t to justice to the very well-finished and stylish control box.
There’s a bit of hum in the background of the video — that’s just my refrigerator, which is right behind the camera. Also, the inclusion of The Pits of Hell at the top of that stack of books is in no way a reflection of how I feel about the Mober DC kit!
One small note on the above video. In the manual, Edmund says that once the screen goes off, if you want to double-check the current speed, press the opposite button to the one the platter’s currently spinning at — so, hit 45 if you’re at 33.3. In the video, I mention this, and show how it works, hitting 33 while the platter’s spinning at 45. But if you look carefully, you’ll see that the speed actually wobbles when I do so: it drops, then speeds back up. I thought this might be a blip, but it’s happened again while listening to music. I asked Edmund about it, and he said that pressing the button actually jars the CPU mechanism. The solution is to turn the trim pots (the 0.1 pots on the right) rather than the 33/45 buttons if you want to check current speed. It’s also a reminder to be gentle with those buttons.
If you want a closer look at the setup I had in place for that video shoot, here it is:

The Mober DC unit in context
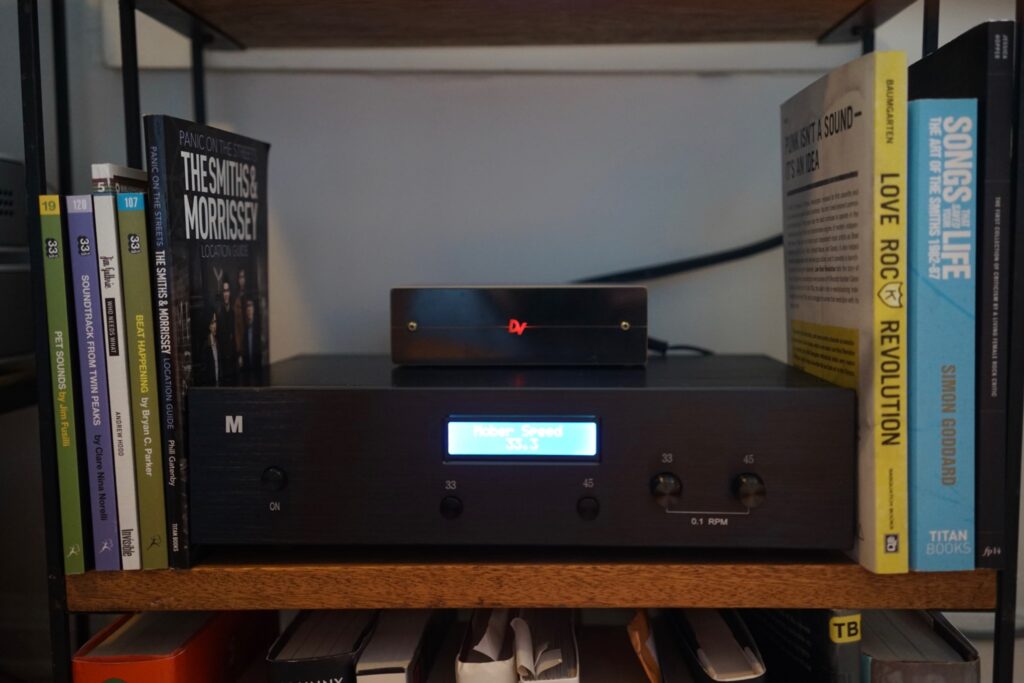
I’ve now got the Mober DC unit all set up in my office. Here are a few photos to show you what it looks like. As I said, I think it’s pretty cool looking. And I like that the control unit is compact and fits on my small shelves. I don’t know where I’d put a Radikal, even if I could afford one…


First impressions
I’ve been listening to my system a lot lately, and doing a lot of “critical listening,” trying to figure out why the Ekos/XX-2 combination didn’t sound better than it did, and if swapping out the Kore would improve the situation. I don’t want to jump to conclusions, but it does seem worth recording some initial impressions on the Mober DC unit, which seems to have made a large positive difference.
When I brought the table it back to my office, I could see the bounce had changed a bit and the suspension needed some work — probably caused by my changing the belt while putting in the Mober DC motor, which is enough to throw off the bounce. But I was tired after a long day and decided to put off fixing it until the next morning, and listened to a few records.

First, was Sun Ra, Heliocentric Worlds vol 1. Then Prince Lasha, The Cry!, King pressing, then Graham Coxon’s, The Spinning Top. I noted:
Every single one of them sounds stunning. Strong sense that these are all much better than I’ve heard any of them before — and each of them is a really nice-sounding record. I’m listening to The Spinning Top right now, and it’s just gorgeously springy, bright, lively. I’m hearing details I’ve never heard before. The impression is not of the “noise floor” being lowered — is of it just sounding BETTER: crisper, better-focused, huge, wide, engaging, engrossing. Immense sense of excitement coming from this setup, no question.
Next I put on the Music Matters pressing of Andrew Hill’s Point of Departure. I noted:
Stunning, amazing, like never before. The reed instruments are absolutely gorgeously textured and stunningly present, as are Anthony Williams’s drums. Also, I don’t need to turn it up loud to get the gorgeous sounds. Amazing.
Then I put on my newly acquired red vinyl copy of Stephen Malkmus’s Traditional Techniques, great music but a middling-sounding disc. It also definitely sounded better than ever. So the setup appeared to be making all discs sound better, the perfectly produced and the merely okay.
And all of that was with the suspension set slightly incorrectly and a non-pistonic bounce.
Today, I took the deck downstairs and fixed the suspension and made the above video. I’ve written this post while listening to my first Canadian pressing of Roxy Music’s Avalon, a US first pressing of Can’s Future Days, my OJC pressing of Mal Waldron’s The Quest, and the Giles Martin Sgt. Pepper. All of them have sounded superb — exciting and notably, attention-grabbingly excellent. I think the main difference is a kind of laser focus that brings every instrument into beautiful relief.
We’ll see if my enthusiasm holds, and how my test tracks fare. I’ll give myself a few weeks to get used to the sound of the Mober DC kit before giving my final verdict. But for now, this seems like a really exciting upgrade — one of the best yet. And one that may finally be allowing me to hear how good previous upgrades sound, such as the XX-2.
Time to listen to some more records…

23 Comments
Join the discussion and tell us your opinion.
Ah it great to be able to interact at last! I have been on a very similar path to you with my own Sondek from a box of bits. I am very much enjoying the content, process, and learning of new music. Come on, get fettling!
Thanks, Shane! Yes, finally figured out how to turn on comments. It was buried deep down in my theme’s options. Thanks for reading! Much fettling to come!
Re-reading this, I note you have removed the compliant grommets twixt motor and top plate. I am not sure this would be ideal for obvious reasons. Might be worth running this past Edmund. I have mine in place, and it is silent.
Some smart internet friends (YNWOAN from pinkfishmedia, designer of the Tranquility) suggested that, and I think it’s been slightly quieter running this way. I ran it my Edmund, and he said he thought it shouldn’t make any difference. I’m interested in trying one of these as a more elegant solution to what the compliant grommets are supposed to do without introducing the tilting/instability that (I believe) they do: https://www.elusiveaudio.co/linn-rega-motor-upgrade.html
Theoretically it SHOULD make a difference, shouldn’t it? Like car engine mounts, or suspension? Without the material between, its coupled directly. For better or worse. Worth experimenting then! I have to fit the new Hana this weekend, so, I will have a fettle.
Agreed that it should make a difference. YNWOAN’s take was that the compliant bushings were a poorly thought-out way of decoupling the motor from the top plate (poor because it allows the motor to tilt, among other things) and that no decoupling is better than poor decoupling. Anyway, something to test. My setup sounded terrific before removing the bushings, but I did hear a bit more noise coming from the motor (though it’s possible something else was causing it, and removing and replacing the motor fixed something I wasn’t even aware of). It also sounds excellent after removing the bushings 🙂
Noise coming from the motor is better (in theory) than vibration in the top plate! Interesting and exciting.
Hello. Have you tried the mober bearing out yet? If so any thoughts on it?
Hi Rod. No, not yet. I have a lot of bearing stuff (Mober bearing, Tranquility bearing support, worn vs. brand new Cirkus) I’m going to try together once I have everything else all done. I must say I remain quite skeptical of the design of the Mober, which doesn’t make a lot of sense to me. But I’m going to give it an honest shot! Probably in a month or a month and a half…
Hello, I’m in the mood for going DC on my LP12 using a Greenstreet Geddon PSU + Keel_Klone subchassis also from Greenstreet.
Do you think the Mober thicker top plate (6mm) will help to intall easier the DC motor and the tachometer sensor than it was on your Khan top plate?
It should definitely be an easier and cleaner install. My Mober top plate didn’t arrive yesterday as FedEx had promised; I’ll have it Monday and get it installed during the week…
Have you also find a huge improvement from Geddon PSU +AC original motor towards the Mober DC?
The Mober DC is about 4 times the price of my DIY Geddon with the Greenstreet 2 electronic cards… The Geddon is absolutely fantastic and much better than my previous Lingo1…
First, thanks for your posts. They’re interesting and informative. I have the Mober. I like it, but I’m concerned that it’s wow & flutter readings are poor (based on the possibly unreliable RPM app). I’m getting readings of about .32, which isn’t very good. I wonder if the Lingo 4 might be better in that front—-any thoughts? I know you had a frustrating experience with the Lingo 4 ac motor, but still I wonder! Matt
Hi Matt — thanks for your comments. I seem to remember trying the wow & flutter with the RPM app and getting good results, but it’s definitely something interesting to look into. I wonder if someone has a more accurate measurement system they could try… As for the Lingo, I’m still hoping to get mine repaired and back in good shape. If I do, I’ll be trying it again!
Hello,
Since about a week i have the Karousel bearing fitted and YES it’s a huge upgrade versus Cirkus bearing +TPT…! But Edmund hasn’t yet tested the Karousel with his Mober DC… So he isn’t sure it will match and he is waiting to get a Karousel to make some tests whether or not it will work?
Maybe you already have upgraded to the Karousel bearing and are able to say if it is compatable…
Regards
I have the Karousel with Mober. It’s working for me
Hello Adam,
Could you please give more details on the installation process of the Mober top plate?
Are you fitting everything on the top plate, such like the subchassis with 3 springs before finishing installation onto the plinth?
What about the GND connection used with the Linn AC motor?
Kind regards
Hi Bernard,
I haven’t installed the Mober top plate yet. I’ll put up a post when I do. But generally, no, the top plate goes onto the plinth first, then everything is added afterward.
I have received my Mober DC on september 22Th…
But i have speed issues at random!
Edmund said that a new tachometer sent free of charge will cure the issue!
But the issues are still there and he has no solution for this issue but only offering a full refund while returning the product…
So i’m not happy with this unexpected solution…
Sorry to hear about this experience. My Mober has been rock-solid since I got it. The only time I had a speed wobble was the result of incorrect tachometer placement (my mistake). In its current position — held in place with blu-tack — it hasn’t given me any problems at all.
One thing I will mention: I had a much worse experience with my Linn Lingo 4 (noisy motor), and Linn totally refused to offer an exchange or refund. So at least Edmund is being responsive and offering a refund.
Yesterday in the evening, i believe i have made a giant step ahead while probably for sure at 99,9%, find the culprit aka the weak element (Achilleus’s ankle) and better also cured the mess!
It was the Neutrik connector from the cable!
The plastic enclosure was not fully screwed and tightened so probably a loose connection…
Since that cured and about 10 records listened, no more speed error yet…
I’m happy not to have sent back to HK a working error free unit with only an ombilical chord with a messy connector!
By comparison, the connector from the Geddon by Greenstreet is a much better choice because you also have a metal ring to fasten the connector to the chassis convenient outlet…
Adam on your picture i can see your Neutrik connector:
it has a metallic ring to secure a good fastening tight! But holy sh… i got a cheap one instead with a plastic ring unable to keep the connector fully screwed!
This was the origin of the mess i suffered from now quite a month ago…
Let me know how to upload a picture of my poor shitty connector…
Hi Bernard — yes, my connector has a metal body. You can send me a pic of yours at hifiafblog (at) gmail [dot] com